Zorndorf ; Creating the Scenario
 |
| Carl Rochling – Prussians Marching to Kustrin on the way to Zorndorf. |
Now that I have selected the Battle of Zorndorf for my next wargame scenario, let me share with you how I created the tabletop and the forces for both Russian and Prussian armies.
 |
| Overhead view of my Zorndorf table, the 12ft long version. |
 |
| Colorful Russian munitions wagons that were scratch built by Ed Phillips |
Information Sources for Zorndorf
I always begin a scenario design by looking at „The Army of Frederick the Great“ by Christopher Duffy for a short battle overview. Since Duffy is the premier authority on the Seven Years War, I trust that his information is going to be accurate.
My other main sources are Kronoskaf and the Obscure Battles web sites. Click on the links below:
I also consulted the Osprey campaign series book titled „Zorndorf 1758, Frederick faces Holy Mother Russia“ by Simon Millar
You can click on the above links at your own time and convenience, but taken together, I think that you will have a pretty good database of informtion on the battle if you are interested in learning more.
 |
| My Russian brigade of Galitzen, right flank resting on the Zabern Grund. |
Zorndorf by the Numbers
Any historical scenario has to start by examing the numbers of forces in each of the combatant’s armies.
So starting with Christopher Duffy, here are the numbers on the armies:
a) Prussians: 38 battalions (25,000), 120 squadrons (10,500), and 193 cannon (including 117 heavy pieces, the balance probably being 3-pound regimental guns)
b) Russians: 55 battalions (36,308), 21 squadrons (3,382), circa 3,000 irregulars – Cossacks, 136 cannon (no break out of heavy vs. regimental guns)
Once I am satisfied with the number of combatants, I calculate the ratios of one army to the other to help me plan my game order of battle. One quickly sees that the Russians have a distinct advantage in infantry, but this is offset by the Prussian superiority in cavalry and artiller. Yes, the Russians are outgunned in this battle.
The infantry math: 36,308 Russians divided by 25,000 Prussians equals a Russian advantage of 1.4x the number of Prussian infantry.
The cavalry math: 10,500 Prussians divided by 3,382 Russians equals a Prussian advantage of 3.0x the number of Russian cavalry. Note that I do not include the Cossacks in the Russian cavalry ratio.
The artillery math: 193 Prussian cannon divided by 136 Russian cannon equals a 1.4x Prussian advantage in artillery.
Converting the Historical Numbers Into Wargame Forces
Now we are getting down to the essential element of the game design, which is figuring out how many wargame figures to use, based on the ratios calculated in the above section.
Reducing the forces by half method: Sometimes I will employ the method of taking a percentage of the actual forces and turn them into battalions of infantry and squadrons of cavalry. For example, if I reduced both armies by half then I’d wind up with something like 26 Russian battalions and 10 squadrons versus 19 Prussian battalions and 60 squadrons of cavalry. This is still a huge wargame to stage plus I do not have the figures required to stage such a game.
Reducing the forces by thirds method: Next I try reducing the forces by one-third and hope that this results in a more manageable force of wargame figures. So 55 Russian battalions are divided by 3 to yield 18 infantry battalions; 21 squadrons divided by 3 equals 7 cavalry squadrons. The Prussians would have 38/3 = 12 battalions and 60/3 = 20 squadrons. This is actually doable relative to the number of Russians and Prussians that I either have already or will have after painting needed figures.
You could obviously use other percentages such as one-quarter of the actual forces to suit your needs and/or the size of your game table.
Using Multiples of the forces that I have method: The one-third method might work for me, but now I want to come at the numbers from a different direction. That is, starting with 12 Prussian battalions of infantry and multiplying that number by 1.4 (the Russian advantage in infantry) and this equals 16.8 Russian battalions, rounding up to 17 battalions. The cavalry go the other way, starting with the 18 squadrons of cavalry that I have in my collection of Prussian cavalry, and then dividing that total by 3 (the Prussian advantage in cavalry) which equals 6 squadrons of Russians. I have 7 squadrons in my collection of Russians so I might fudge a little bit and give them the extra squadron.
Player Commands: I now compare the forces above with the number of players in the game and create infantry and cavalry commands. Using my famous „Jim’s Rule of Fours“, which states that the average wargamer can comfortably handle four elements of infantry and cavalry regiments, I can easily divide my 12 Prussian battalions into three brigades of four battalions. Conventiently, the Prussian army was divided into three commands at Zorndorf: Manteufel’s advance guard, Kanitz‘ left wing (or center) and Dohna’s refused right wing.
The cavalry brigades might be slightly bigger than four. I paint 24-figure cavalry regiments divided into two „squadrons“ of 12 figures for game purposes. So 18 Prussian cavalry squadrons represents 9 regiments of 24 figures. I can divide the cavalry into one brigade of 5 regiments and one brigade of four regiments. Or I could have two brigades of 4 regiments and pull out the extra regiment as a „reserve unit“ that can be used later in the game. I will have von Seydlitz command the left wing of the cavalry and Schorlemer will command the right wing of the cavalry. I will ignore the reserve cavalry units that were in the battle because I’m effectively assigning those troops to my cavalry command.
This generates five commands for five Prussian players in my game.
The Russians‘ 17 infantry battalions will have to be a little bit larger than the Prussian establishment. By coincidence, the Russians had three infantry commands at Zorndorf so I will try to shoe horn the 17 battalions into three brigades. These brigades will include 6btns for Galitzen (right flank), 6 battalions for Saltykov (center), and 5 battalions of Observation Corps troops on the left flank. I think that I will adjust things and place 5 battalions in Galitzen’s brigade , keep Saltykov at 6 battalions, and increase the Observation Corps brigade to 6 battalions.
As noted previously, the Russian cavalry contingent was very small. I have 2 squadrons of horse grenadiers, 2 squadrons of dragoons, 2 squadrons of hussars, and 1 squadron of cuirassiers, I will place the horse grenadiers on the Russian right flank because that is where they were historically. The other 6 squadrons will be placed in Demiku’s command on the left flank.
Cossacks – I have 36 Cossacks broken down into three squadrons of 12 figures. These can be placed anywhere at the discretion of the Russian army commander. Cossacks are not allowed to charge formed units unless they are approaching from the rear. Even then, the Cossacks must take a morale check to see if they will even charge. So Cossacks are not particularly effective on the battlefield, but I want to include them nonetheless.
Determining the ground space of the game
My original goal was to cram the battle onto my 6ft wide by 12ft long game table. This also happens to be a good size of table for most wargame conventions (participation games for our UK friends).
I had several ideas for the game, one of which was to simulate only the attack of Manteufel’s advance guard and Kanitz’s center command which was supposed to follow Manteufel and give him support. I would then ignore the action on the right flank , which took place in the final phase of the battle and is conveniently out of view of the Prussian advance guard and center.
But I wanted to try to do it all. Fritz doesn’t do anything „nice and easy“.
Starting with Clash of Arms Zorndorf board game
 |
| Clash of Arms Zorndorf boardgame box cover. |
The Clash of Arms (COA) company makes some of the most beautiful game maps for the SYW that I have ever seen. They produced Lobositz, Kolin, Leuthen and Zorndorf. I know some of the principals at Clash of Arms so I have a high degree of confidence in the accuracy of their boardgame maps.
The maps have hexes overlayed on them, which follows the convention of most board games. So I had to create a ground scale of sorts in order to convert the COA map into a wargame table top. After a couple of iterations using different scales, I settle on each hex representing 4-inches of game table area.
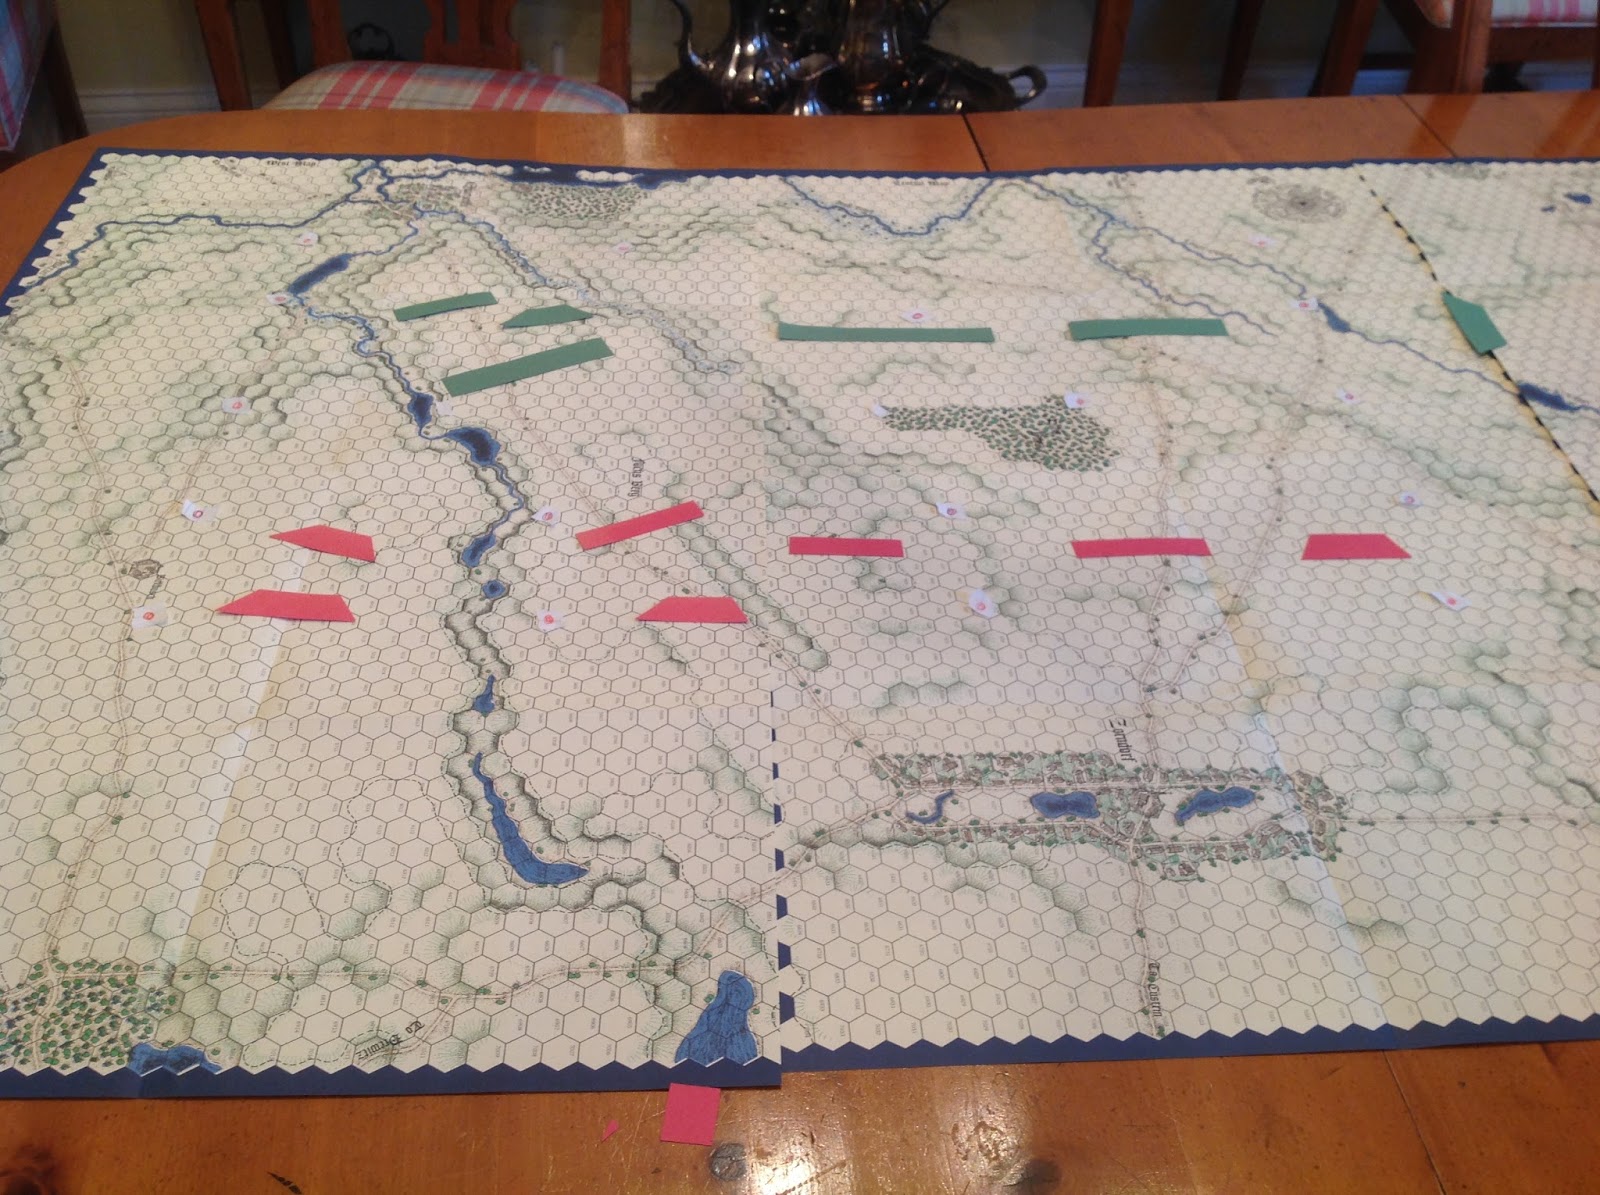 |
| Clash of Arms Zorndorf game board showing the hexes and the relative placement of Prussian (red) and Russian (green) forces |
This made it relatively easy to measure distances and locations of certain terrain features and translate them into the exact placement on the game table. For example, if the hexes indicated that the Stein Busch was X-number of hexes from the left table edge and Y-number of hexes from the Prussian baseline, then I coul figure out where to place the Stein Busch on my table and have its area relatively accurate vis-a-vis my 12 foot long table.
See the map below of my game table layout (click map to enlarge the view):
 |
| Table map showing the 6ft wide center table and two back tables that are 2.5ft wide by 12ft in lenght. |
As shown above, there will be a center table and two back tables, separated by aisles, to provide depth to the table surface. I subsequently decided to add three more feet of table length on the righthand side so as to make it easier to game the large cavalry battle that occured on the right.
 |
| The three feet of table extension on which the bulk of the Prussian cavalry is deployed. Every game table must have a windmill on it. Stein Busche shown on the lower left corner. |
That’s pretty much the methodology that I used to create the game table and the orders of battle for my Zorndorf game that will be played in 2018.
Dieser Artikel stammt von einer der angeschlossenen Quellen. Bitte honoriere die Arbeit der Autoren indem du ihren Webseite besuchst.
Artikelquelle besuchen
Autor: Der Alte FritzDer Alte Fritz JournalDer Alte Fritz JournalDer Alte Fritz Journal
Powered by WPeMatico