Fife & Drum AWI Rules Tutorial
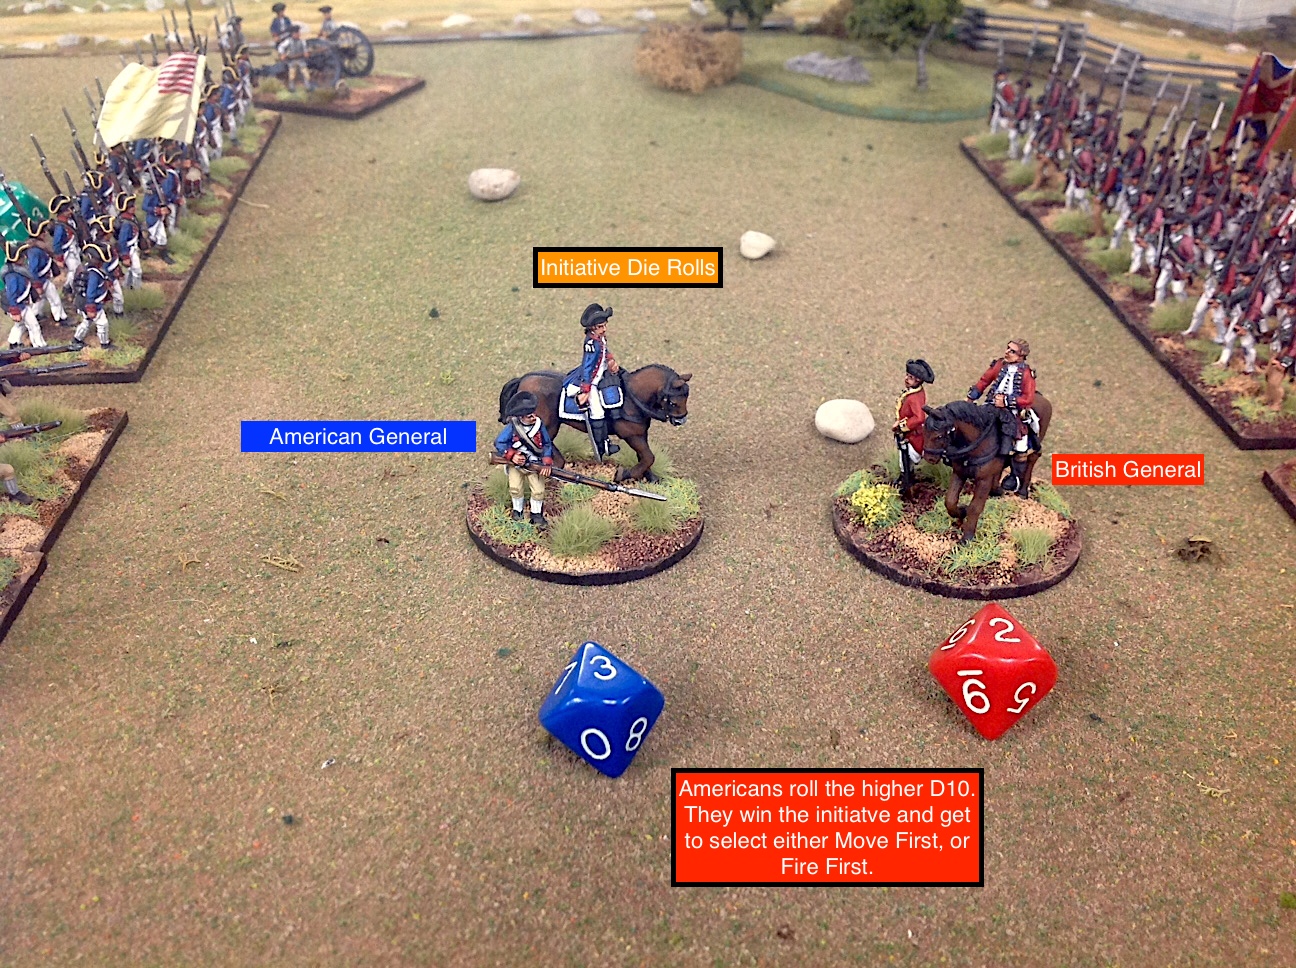 |
| Each turn the general for each army rolls one D10 die for the initiative. The player that rolls the higher die gets to choose either to Move First/Fire Second or Move Second/Fire First. |
Game Turn Sequence
2) Rally shaken or routing units
A general may attempt to rally any routed units during this phase. All rallies from a rout are conducting on the „C Chart“ of the morale tables. A Shaken unit may restore good order status either through a rally dice roll or by remaining stationary for a full turn after the turn that it went to Shaken status.
3) Movement and announcing of charges
The side that has the first movement initiative can now move any units and/or announce any charges that it would like to make. After Side A moves, then Side B may move and/or conduct a charge.
4) Firing Phase
Firing of muskets and artillery are done during this phase. The side that has the First Fire initiative will fire any units that have a target. The other side will have to test morale for any losses that it receives during the firing phase before it can return fire.
5) Melee Phase
6) Morale Test Phase
Any unit that took casualties on the turn will have to test its morale at this point of the game, if it has not already done so (i.e. the unit is required to test morale if it receives casualties during the Firing Phase.
7) Reserve Moves Phase
Any unit that is 30-inches or more away from any enemy unit may take an extra movement at this point. The reserve movement ends the moment the moving unit moves within the 30-inch distance from an enemy unit.
The Game Charts
 |
| Annotations illustrate how to find the required number on one D10 die. |
Melee and Morale functions are determined in the same manner as the Firing function. First look for the Unit Type in the far left column, then examine the Melee or Morale columns to assess which of the columns, A through E, that fits your unit’s situation. This produces a number and your dice have to roll a number that is equal to or less than that number.
 |
| Annotations illustrate how to test morale |
The one-sided rules sheet is divided into five larger columns, from left to right:
1) Unit Type
2) Movement
3) Firing
4) Melee
5) Morale
Each of the above columns is further divided into eleven rows. Each row represents a category of troop types that typically fought in the AWI. The troop types are shown below and are located in the left-most column on the rules page.
Unit Type or Troop Type
1a) Grenadiers/Guards/Light Cos.
1b) British/Hessian/French Regulars
1c) Continentals and Loyalists
1d) Riflemen, Jagers – unformed troops
1e) Militia
1f) Indians – unformed
1g) Cavalry
1h) Heavy Artillery (over 9-pounds)
1i) Medium Artillery (6-8 pounds)
1j) Light Artillery (3-4 pounds)
1k) Amusettes (1-2 pounds
Movement Rates
Each troop type has its own distinct movement rate depending on its formation:
Road March
Skirmish
Column
Line
Square
Some troop types will move faster than those of lesser quality troops. For example, British Regulars move 10-inches in line formation compared to 8-inches for Continentals and Loyalist or 6-inches for militia.
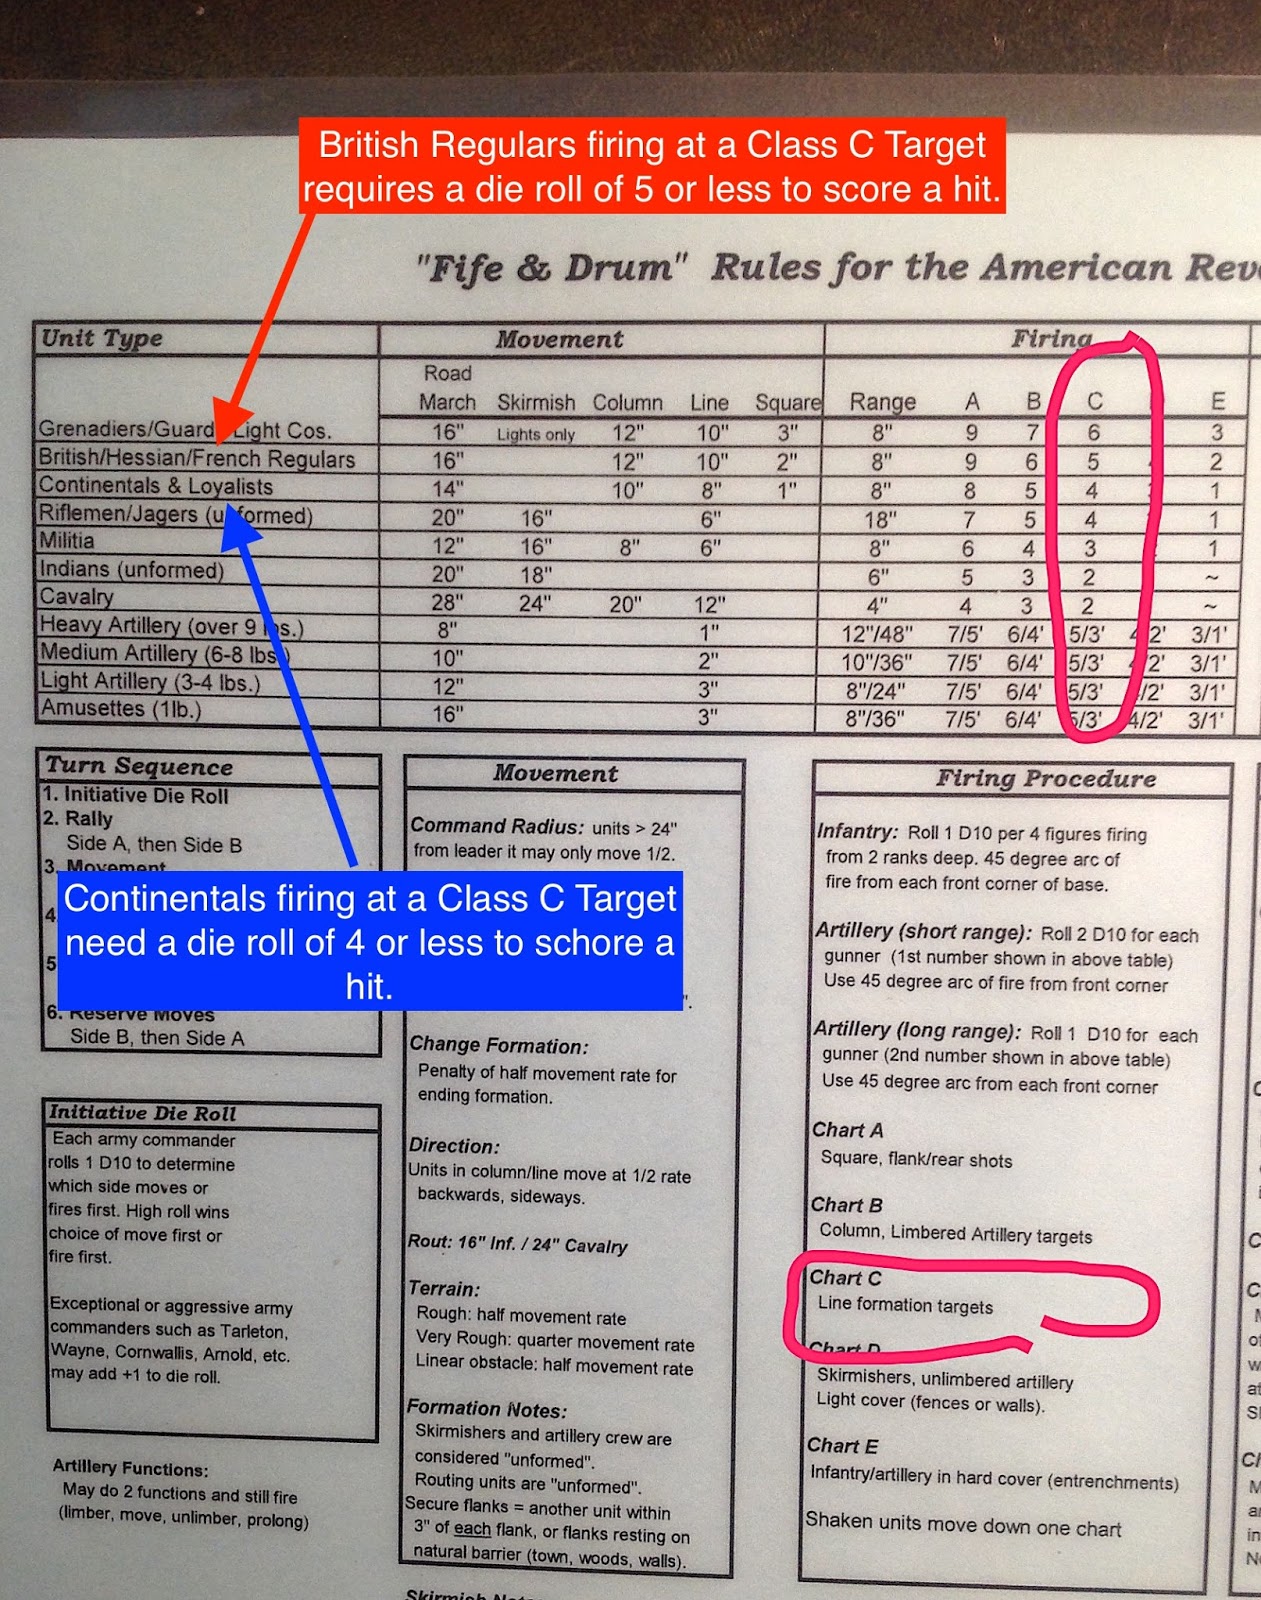
Firing Columns
There are five columns marked „A“ through „E“ on the chart. Each of these columns represent a different type of target ranging from easiest to hit („A“) to the most difficult to hit („E“). In most instances the „C“ column will be used
Below the Firing column is another column labeled „Firing Procedures“. It helps you to determine the class of the target, depending on the type of formation that it is in. In most cases, both sides will be classed as C Targets since they will probably be in Line Formation out in the open.
Melee Columns
Using the same mechanical process as the Firing Chart, assess whether your unit has a Major Advantage (Column A), a Minor Advantage (Column B), Equal = no advantage (Column C), a Minor Disadvantage (Column D) or a Major Disadvantage (Column E).
Then locate the row (left hand column on the page) that corresponds to your Unit Type and move across the Melee tables to the appropriate column A through E. In most cases, the two sides will have no advantage over the other, which results in use of Chart C in melee. Locate the „hit number“ in the correct column and then roll your D10 dice trying to score a roll at your hit number or less to inflict a casualty on the opponent.
Morale Columns
Casualties are cumulative in the game for morale purposes. This means that the more casualties the unit has in the game, the lower down the alphabet list A through E you go. The lower letter generates a lower number to pass your morale. For example, a Continental unit needs an 8 or less to pass morale in the A Chart (1-4 cumulative casualties in the game), but when casualties grow to 5 to 7, then you have to check morale on the B Chart and the Continentals need a die roll of 5 or less to pass morale. Thus as casualties increase, it becomes harder to pass morale.
Examples of Firing
 |
| Class A Target: firing into the flank or rear of the target. |
 |
| Class B Target: firing into a column or any formation that is deeper than two stands of figures. |
 |
| Class C Target (the most common target in the game): the target is in a line formation out in the open. |
 |
| Class D Target Examples. |
 |
| Roll one D10 for each skirmisher figure. Hits are made on a roll of 1 or 2. |
Determining the number of dice to roll in the firing phase
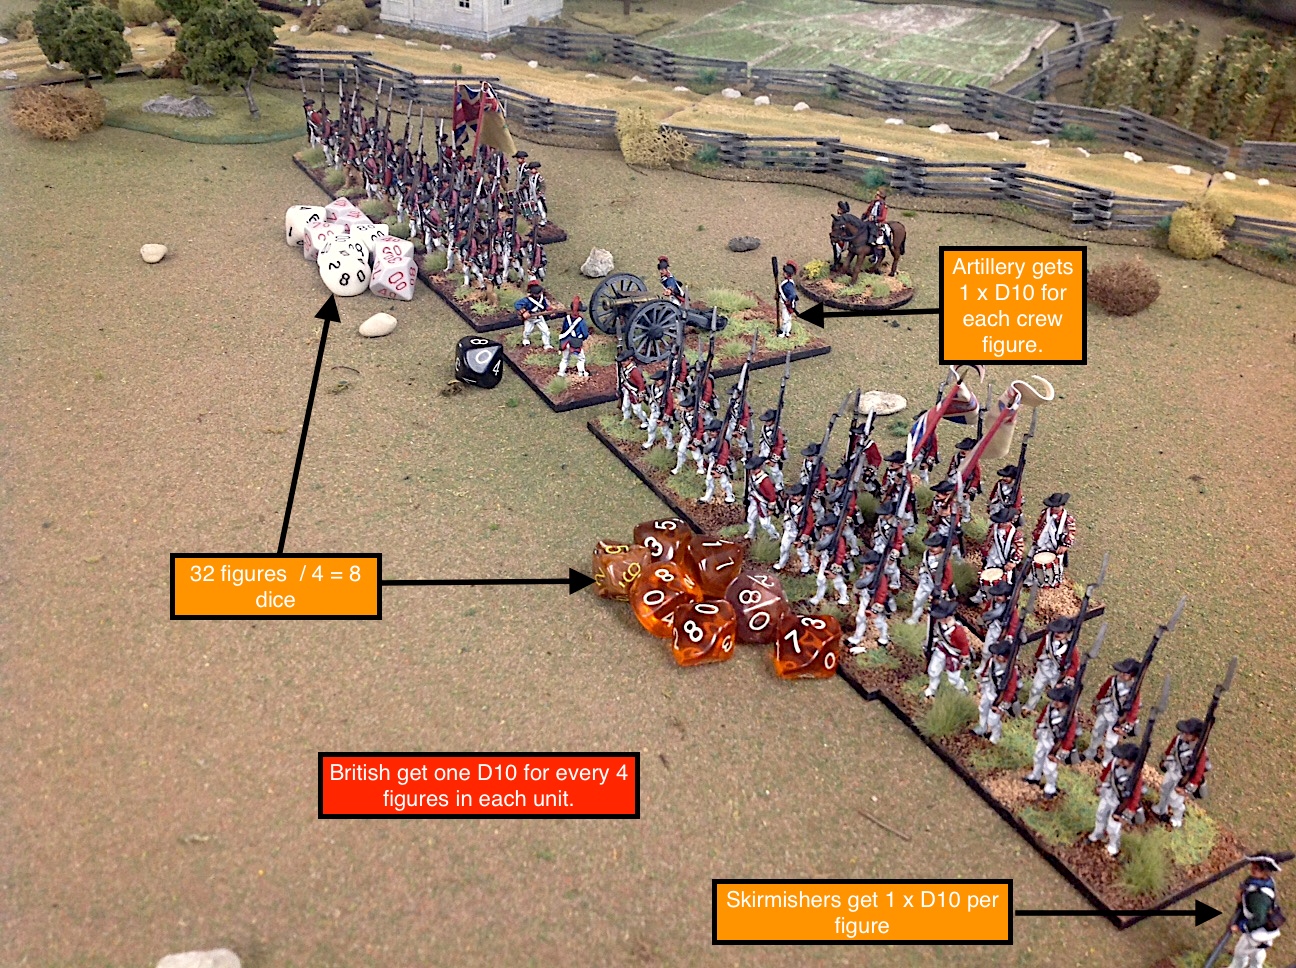 |
| Example of the British firing; they get one D10 for every four figures firing. Artillery at long range get on D10 for every crew figure and two D10 per crew figure at short range (to depict cannister fire). |
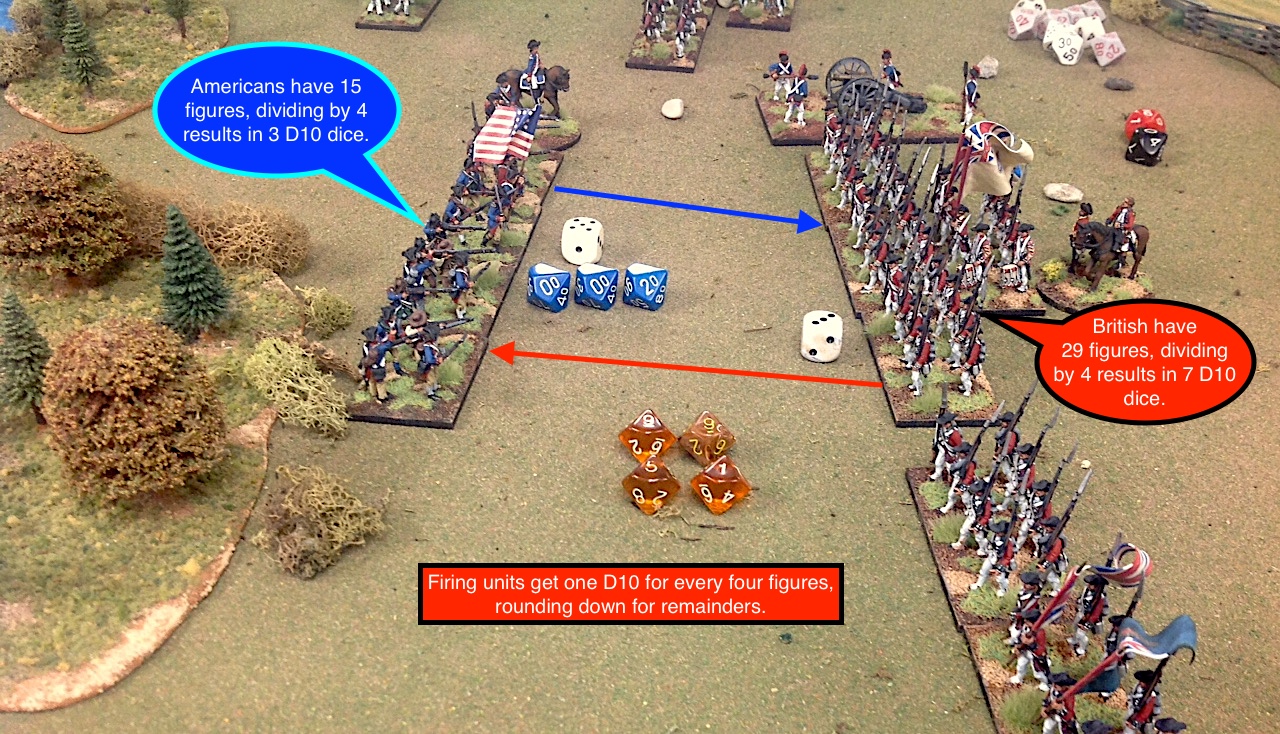 |
| Example of Americans firing. |
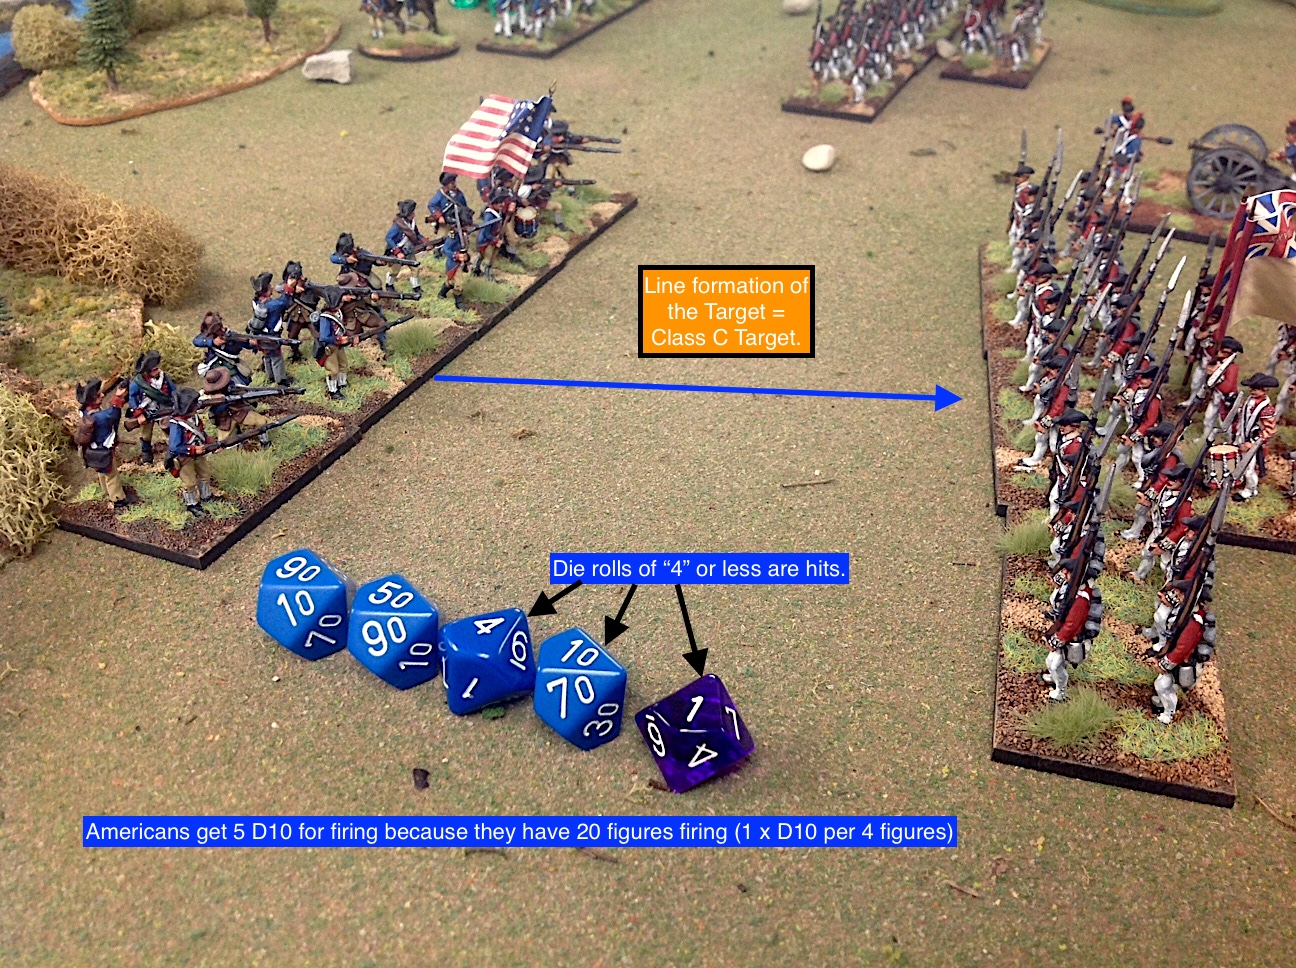 |
| American firing hits and misses on D10 dice. |
 |
| British firing example. The British unit started the game with 32 figures, but has received 3 casualties prior to its firing on this turn. The resulting 29 figures are rounded down to „28“, which is divisible by 4. Since the unit will get one die for every four figures, it will get to throw 7 dice on this turn. In the example above, the British need a D10 score of 5 or less to hit the American target. Two of the dice have scores higher than 5 so they are misses. The five D10 with scores of 5/5/5/4/4 will all be hits. Thus the American unit receves five hits on this turn. |
Artillery Firing Mechanics: short range and long range targets
Artillery fire is conducted at either Short Range or Long Range. The definitions of Short or Long vary depending on the size of the cannon (for example, a 12-pounder has a Short Range of 12-inches and Long Range of 48-inches; however, a 6-pounder has a Short Range of 10-inches and a Long Range of 36-inches).
An artillery piece firing at Long Range will get one D10 for each crew member (excluding crew casualties). See example below:
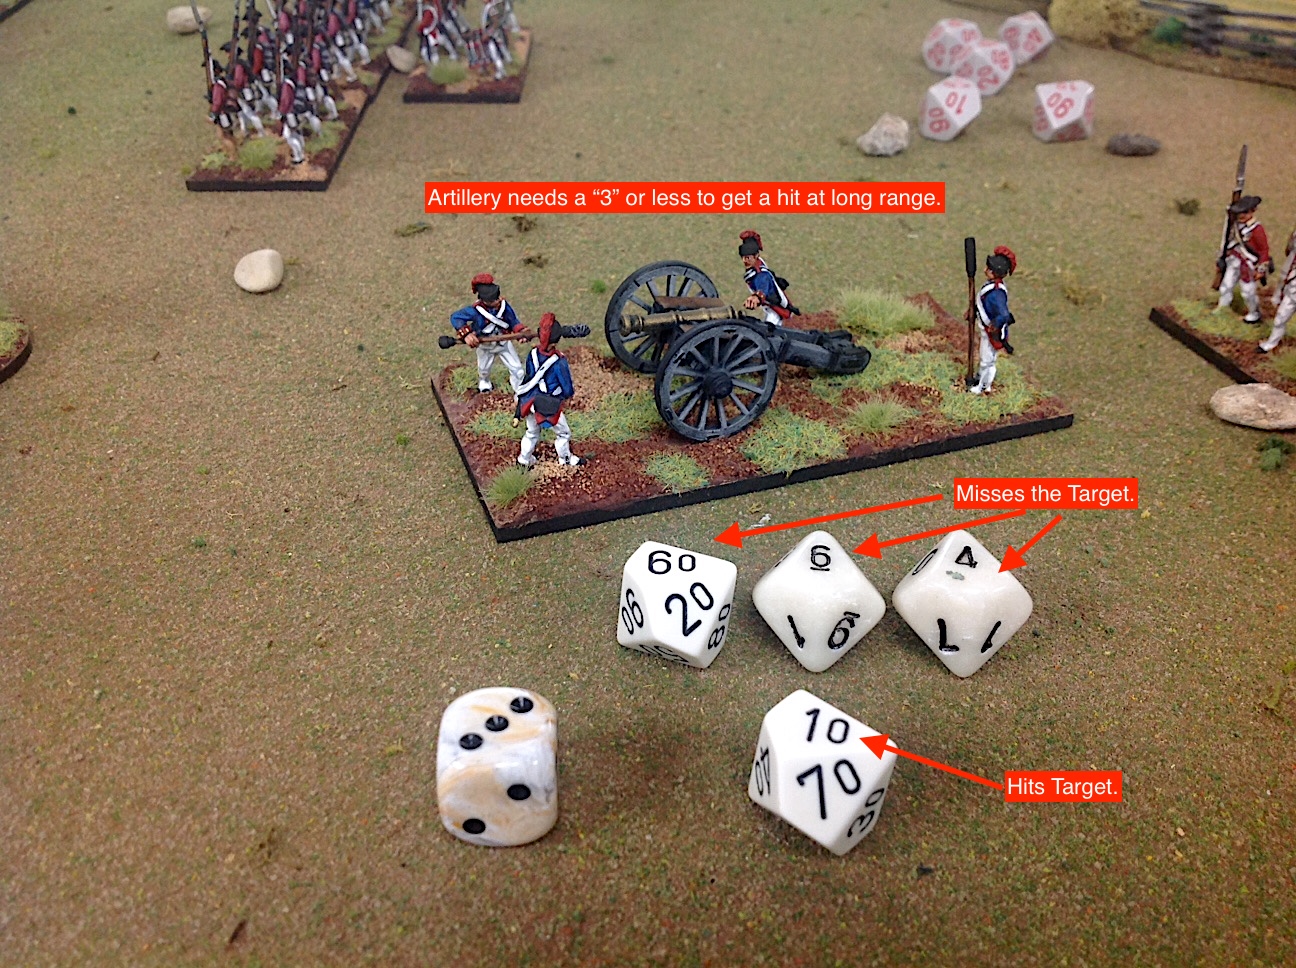 |
| Example of a British cannon firing at long range. In this case, a score of „3“ is required to put a hit on the target. so it only registers one hit based on the dice rolled in the picture above. The 6/5/4 dice scores missed. |
 |
| Determining the number of dice for long range shooting. One D10 per crew figure. |
 |
| Determining the number of dice for short range firing. Each crew figure gets two D10 dice, or double the number of dice received for long range targets. |
Melees
When two or more units come into contact with one another for a melee, both sides will calculate the number of D10 dice that it will get to roll based on the „one D10 per four figures“ mechanism that is also used to determine firing. The dice will then be rolled and compared to a required „hit number“ found in the morale charts. A die roll of that number or less produces a hit. Die roll scores above the „hit number“ are misses and do not count.
After the number of hits are assessed for each side, the side that has the most casualties in the melee will test its morale first. If it passes its morale test, then the other side will proceed to test the morale of its unit/units that were involved in the melee.
If both sides pass their morale without a Rout or Shaken result, the attacker is considered to have failed to dislodge the defender from its position and so it must immediately retire back towards its own lines the required number of movement inches. Attackers that fall back as a result of going Shaken or failing to dislodge the defender will do so facing the enemy. Attackers that Rout will run away with its backs facing the enemy.
Melees will last only one round and the loser of the melee will retire back towards its own lines either at 16-inches for infantry or 24-inches for cavalry.
Morale
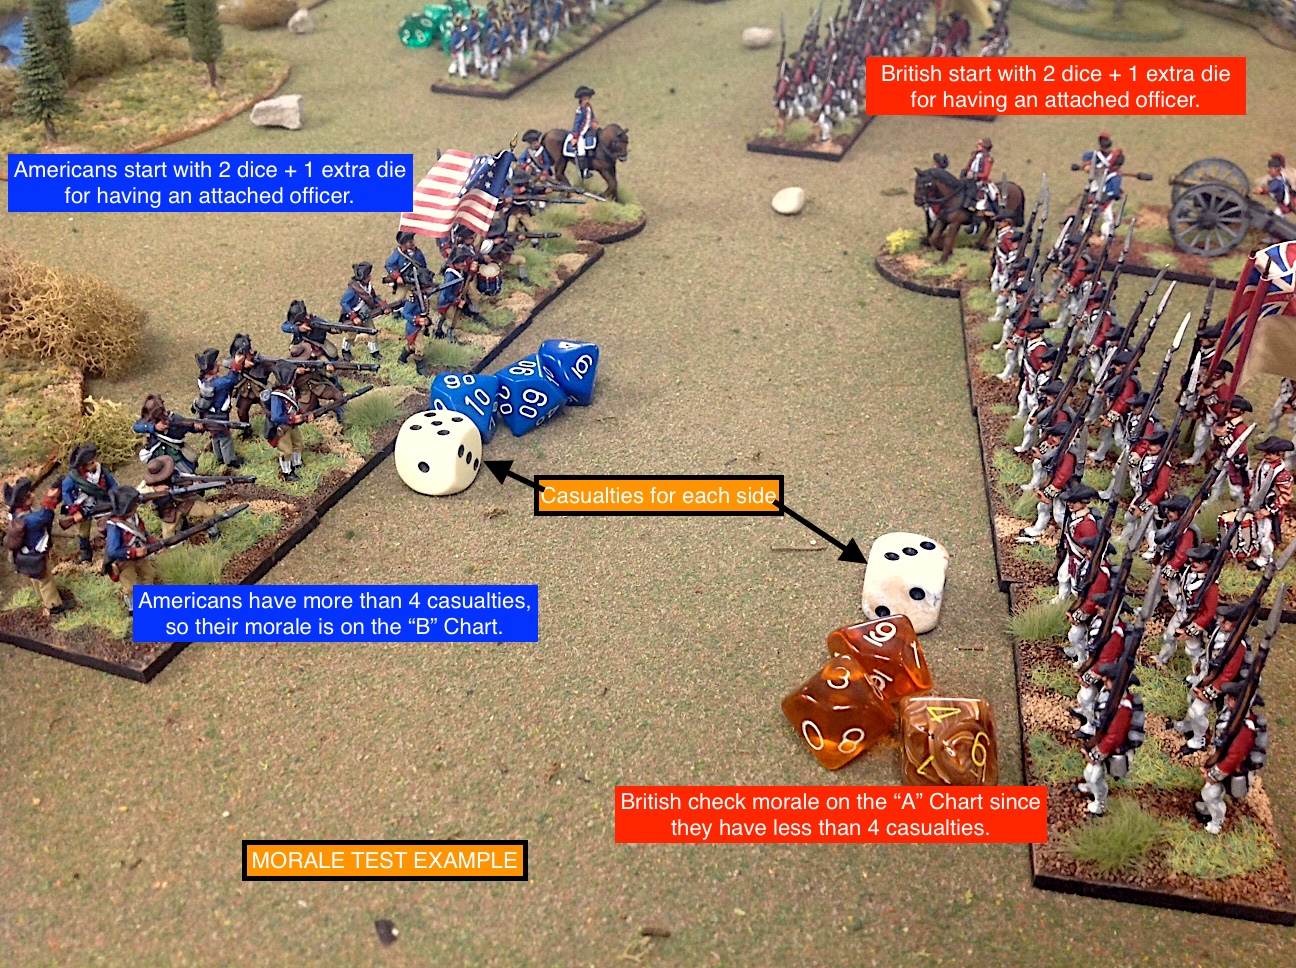 |
| Morale Test Example |
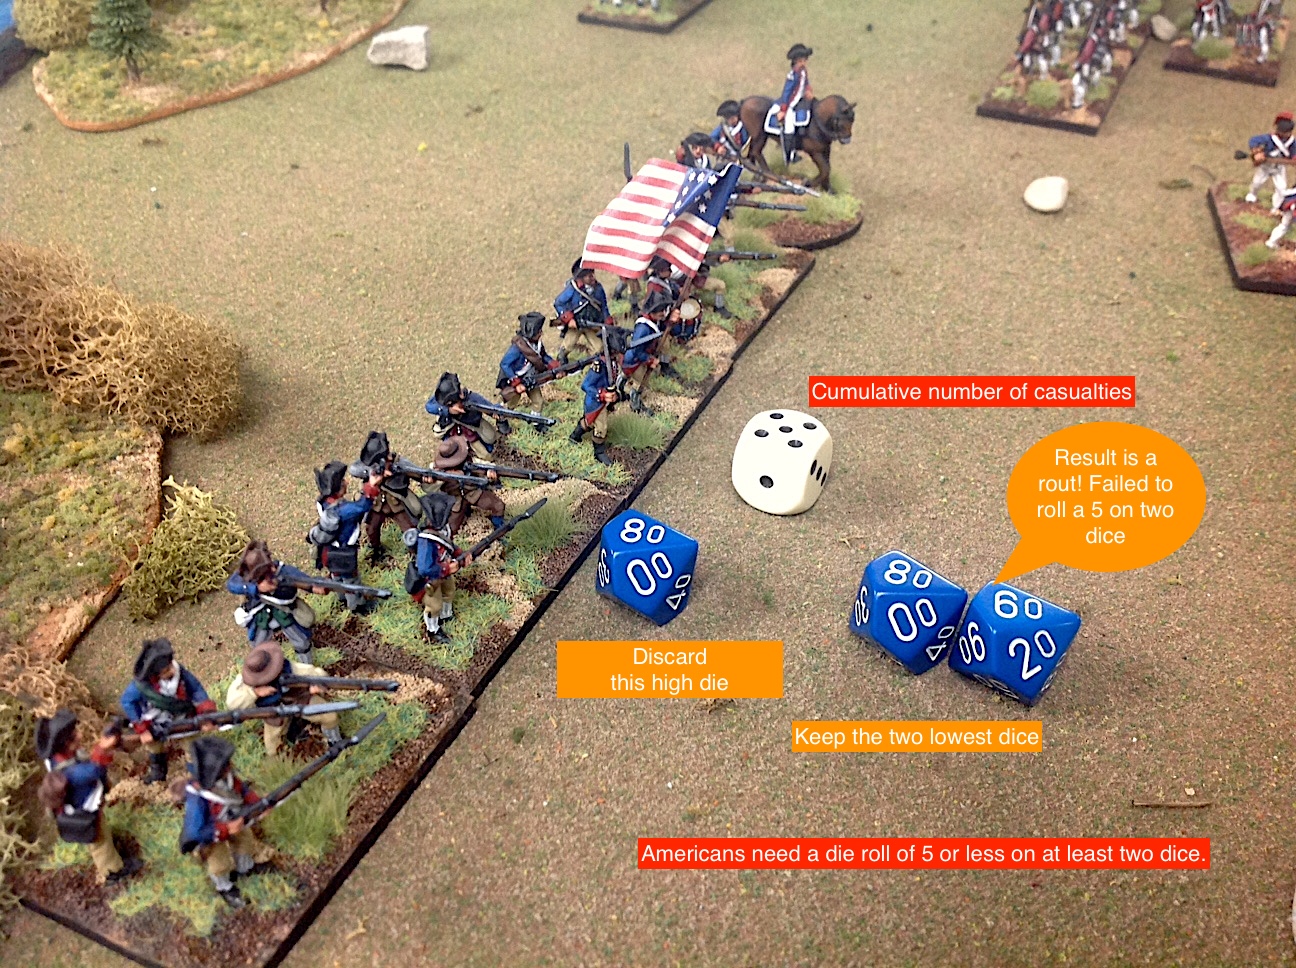 |
| Example of a Rout morale result. |
mmm
jjj
Dieser Artikel stammt von einer der angeschlossenen Quellen. Bitte honoriere die Arbeit der Autoren indem du ihren Webseite besuchst.
Artikelquelle besuchen
Autor: Der Alte FritzDer Alte Fritz JournalDer Alte Fritz JournalDer Alte Fritz Journal
Powered by WPeMatico